Google Cloud Run
This page provides steps to deploy Appsmith on Google Cloud Run.
Appsmith installation on Google Cloud Run operates in an isolated environment, which limits external access to the container for automated backup and restore. Before performing any configuration changes or maintenance tasks, ensure you take a manual backup of your data.
System requirements
Before you begin, ensure you have the following:
- A Google Cloud account.
- An external MongoDB instance for Appsmith data storage. It's recommended to use MongoDB Atlas.
- Whitelist
cs.appsmith.comin your firewall or security group’s outbound rules to allow necessary connectivity.
Prerequisites
Before you install Appsmith, it's important to set up the below prerequisites:
Set up Google Cloud Project
- Create or select a Google Cloud project. For more information, see Creating a Google Cloud Project.
- Enable billing for your Google Cloud project.
- Enable the Cloud Filestore API.
- Enable the Serverless VPC Access API.
- Choose a single region for your deployment and keep all resources (Cloud Run service, Filestore instance, and Serverless VPC Access connector) in that same region.
Create a Filestore instance
Follow these steps to create a filestore instance:
- In the Google Cloud console, go to the Filestore instances page.
- Click Create Instance and configure the instance as follows:
- Provide a name in the Instance ID box.
- Set Instance type to Basic.
- Set Storage type to HDD.
- Set VPC network to default.
- Provide a name in the Configure your file share box.
- Set Allocated IP range to Use an automatically allocated IP range.
- Set Access controls to Grant access to all clients on the VPC network.
- Click Create.
- When the new instance creation is complete, note down the File share name and IP address to use later when mounting the Filestore instance in the Cloud Run container.
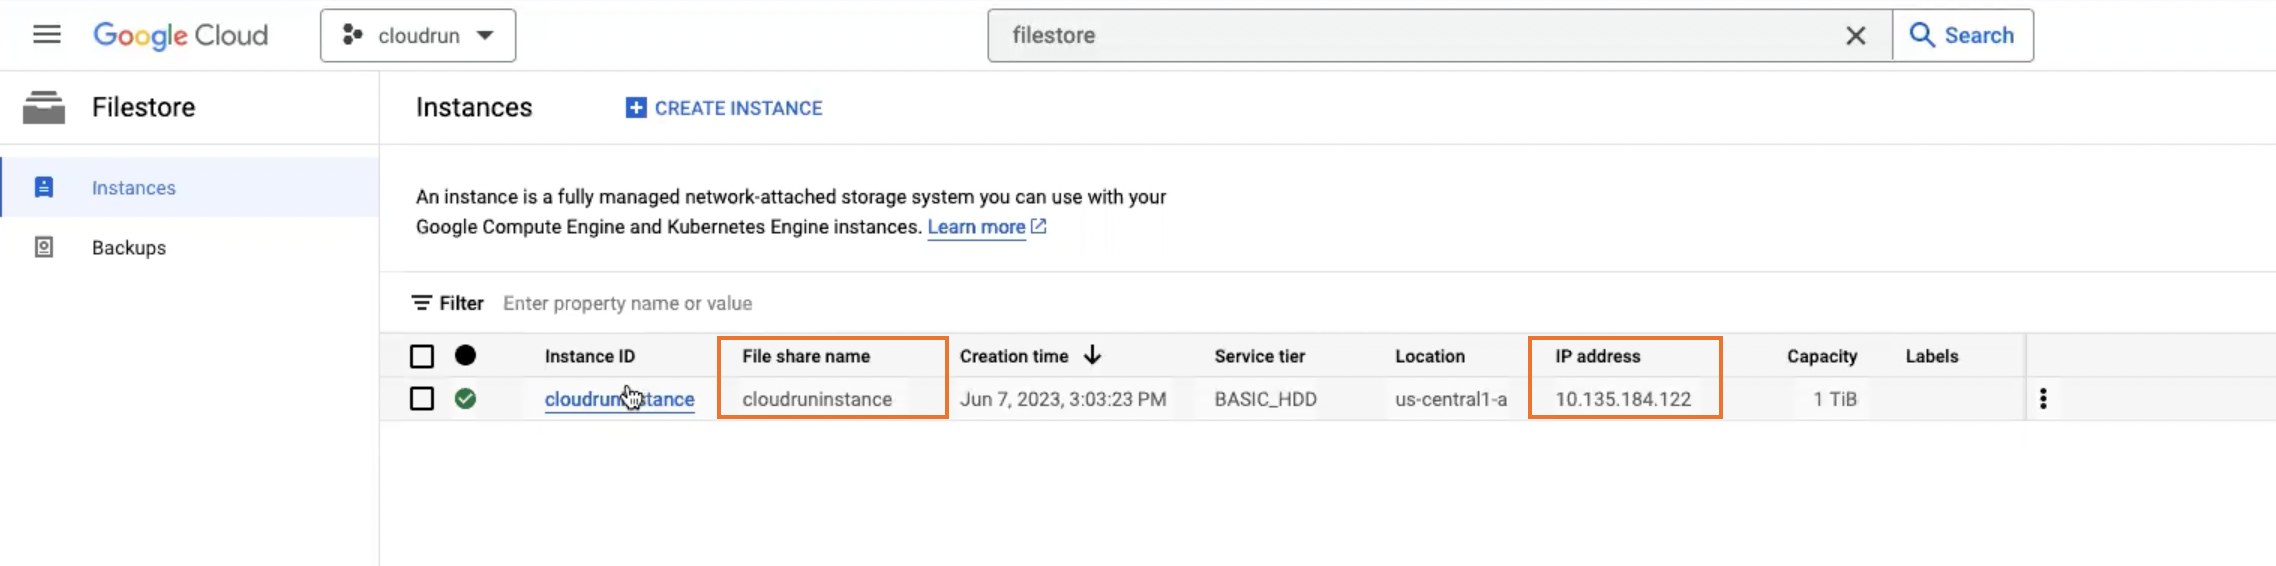
File share name and IP address of the filestore instance
Create a Serverless VPC Access connector
Follow these steps to create a serverless VPC Access connector:
- Go to the Serverless VPC Access overview page.
- Click Create connector.
- In the Name field, enter a name for your connector.
- In the Network field, select the default option.
- Click the Subnet menu. Select Custom IP range from the menu.
- In the IP range field, enter the first address in an unreserved CIDR /28 internal IP range.
- Click Create. A green check mark will appear next to the connector's name when it's ready to use.
Install Appsmith��
Follow these steps to install Appsmith on Google Cloud Run:
-
Go to Cloud Run.
-
Click Create service.
-
In the form, select Deploy one revision from an existing container image.
- In the Container image URL box, enter
docker.io/appsmith/appsmith-ee.
- In the Container image URL box, enter
-
Enter a desired name in the Service name field.
-
Set CPU allocation and pricing to CPU is always allocated.
-
Under Autoscaling:
- Set Minimum number of instances to
1. - Set Maximum number of instances to
4. - Select All to allow direct access to your service from the Internet.
- Set Minimum number of instances to
-
Under Authentication, select Allow unauthenticated invocations.
-
Click Container, Networking, Security to expand the service configuration page.
-
Click the Container tab.
- In the Container port box, enter 80 to specify the port you want route traffic to.
- Under Capacity:
- Set the memory size to 4 GiB in the Memory dropdown list.
- Set the CPU limit as 2 in the CPU dropdown list.
- Under Execution environment, select Second generation.
- Under Volume mounts, click Add volume mount:
- Set Mount path to
/appsmith-stacks. - Set Volume name to
appsmith-stacks.
- Set Mount path to
- Under Volumes, click Add volume:
- Set Volume name to
appsmith-stacks. - Select NFS and enter the IP address you noted in the Filestore Prerequisites.
- Set Path to
/<FILE_SHARE_NAME>(replace with the file share name you created). This mounts Filestore to/appsmith-stacksinside the container, following the Cloud Run NFS volume mount guidance (learn more).
- Set Volume name to
- Under Environment variables, click Add Variable to add each variable in the Name and Value text boxes as shown below:
| Name | Value |
|---|---|
| APPSMITH_DB_URL | Specify the connection string of the external MongoDB instance required for Appsmith data storage. Format: mongodb://<USERNAME>:<PASSWORD>@<HOST>:<PORT>/?authSource=<DATABASE_NAME>&replicaSet=<REPLICA_SET_NAME>[&options] |
| APPSMITH_ENCRYPTION_SALT | Specify an encryption salt to encrypt values in the database. |
| APPSMITH_ENCRYPTION_PASSWORD | Specify an encryption password to encrypt values in the database. |
| APPSMITH_ENABLE_EMBEDDED_DB | 0 |
| APPSMITH_DISABLE_EMBEDDED_KEYCLOAK | 1 |
| HOSTNAME | cloudrun |
- Click the Networking tab.
- In the VPC Network field, choose the name of the Serverless VPC Access connector you created in the preceding section.
- Keep the default Route only requests to private IPs through the VPC connector option.
- Click the Deploy button at the bottom of the page to deploy the image to Cloud Run and wait for the deployment to finish. A green check mark will appear next to the deployed service name when it's ready. This can take up to 5 minutes.
- Click the displayed URL link to open the unique and stable endpoint of the Appsmith instance.
- Fill in your details to create an administrator account.
- Once you've created an account, you can either start with the free plan or activate your instance with a license key. If you want to generate a license key, sign up on customer.appsmith.com to create one, and then proceed to activate your instance using the newly generated license key.
Install Appsmith Community
To install the Appsmith open source edition (Appsmith Community), replace appsmith-ee with appsmith-ce while creating a service in step 3 of the Install Appsmith section on this page.
Post-installation configuration
Once you have completed the installation process, consider performing the tasks below to configure and manage your Appsmith instance, enhancing its security and performance, specifically if it's intended for production use.
Configure high availability for your Appsmith deployment on Google Cloud Run to handle increased load.
Configure SSO to allow users to sign in using your identity provider.
Set up an email service to enable Appsmith to send notifications and alerts.
Set up a custom domain for your Appsmith instance and secure it with SSL.
Troubleshooting
If you are facing issues during deployment, refer to the guide on troubleshooting deployment errors. If you continue to face issues, contact the support team using the chat widget at the bottom right of this page.
See also
- Manage Installation: Learn how to manage your Appsmith instance.
- Upgrade Installation Guides: Learn how to upgrade your Appsmith installation.